
Updated for RodDNA Version 1.201 on 21 October 2004
Edited: 11 November 2004
|
|
RodDNA –
The Bamboo Rod Design
and Analysis Software Updated for RodDNA Version 1.201 on 21 October 2004 Edited: 11 November 2004 |
| Thank you for using RodDNA. Hopefully this help file will answer all of your questions, but if not, please email me and I will try to personally answer any questions you may have. |
Installation
System requirements
Microsoft Windows Installations
Saving Data Files Before Installing a New Version
Linux & Solaris Installations
Uninstalling
Registering
Overview
Quick Start
How To
Entering Model Tapers and Creating
linear tapers
Main Dialog
Modules Menu
What they are
How they work
Entering/Editing
and Validating Data
Menus
File Menu Functions
Edit Menu Functions
Print Menu Functions
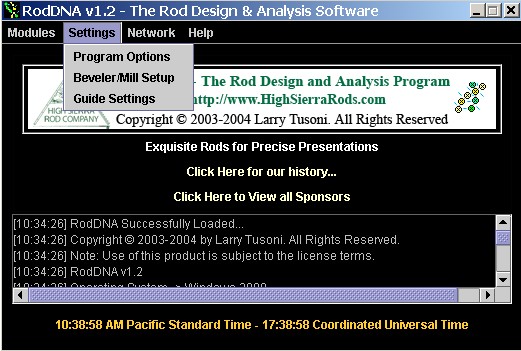
Setting Menu Functions
Program Options
Guide Settings
Beveler/Mill Setup
Network Menu Functions
Profile/Registration
Query On-Line
Rodmakers/Chat
Help Menu Functions
Multiple Module
Instances
Modules - Detailed Information
Models Module
Fields
Tabs
Menus
File Menu
Print
Menu
Beveler/Mill Menu
Tools
Menu
Import
Menu
Controlled Modification
Automatically Generated Models
Rods - Detailed Information
Rods Module
Fields
Rod Serial Number Mask
Customers - Detailed Information
Customers Module
Fields
Vendors - Detailed Information
Vendors Module
Fields
FAQ - Frequently Asked Questions
Release Notes
Future Releases
Support
Other Sources of Information
Credits
Windows 98, 2000 or XP, 128mb ram or more, 200mhz or better processor and a screen resolution of 800x600 or better, and a dial-up or faster Internet connection. Macintosh specifications to be determined.
Microsoft Windows Installations
RodDNA can be downloaded directly from the http://www.HighSierraRods.com website or installed from a CD. For CD installations, simply follow the indicated instructions. You will need approximately 45megabytes of free disk space on your drive c: for RodDNA and data files.
If you have a previous version already installed and you want to save some data see Saving Data Files below.
When downloading, pick a folder to download into that you will remember. When the download is complete, locate the downloaded file (typically named RodDNA-Vnn.exe, where nn indicated the program version number) and double click on it.
This is a self-extracting file that contains the RodDNA files and the necessary run-time and installation files. Please follow the instructions and please read the license agreement. If you agree with the terms and conditions of the license agreement please continue the installation otherwise please cancel the installation.
Once the installation is complete, you will see the RodDNA Icon on your desktop. Simply double-click on the Icon to launch RodDNA.
RodDNA will be installed in the following location:
C:\Program Files\High Sierra Rod Company\RodDNA
Saving Data Files Before Installing a New Version
Before you install a newer version of RodDNA you may want to save your Modules data as the installation program will overwrite all the data files.
If you have a previous version already installed and you want to save some data you can do one of the following:
Save your Models, Rods, Vendors and Customers to the Network via the File Menu options. Then uninstall the old version (see below), then install the new version. The from the File Menu for each Module (Models, Rods, Vendors and Customers) select Load from Network and then save them to your disk.
Alternatively (or in addition), you can manually copy the following files to another directory:
C:\Program Files\High Sierra Rod Company\RodDNA\RodDNAModels.rdm
C:\Program Files\High Sierra Rod Company\RodDNA\RodDNARods.rdr
C:\Program Files\High Sierra Rod Company\RodDNA\RodDNAVendors.rdv
C:\Program Files\High Sierra Rod Company\RodDNA\RodDNACustomers.rdc
Then uninstall the old version (see below) and then install the new version and copy the files back.
Linux, Solaris & Macintosh Installations
You will need to install the version 1.4.01 or later of the Sun Java J2SE or Sun Java run-time system on you computer. Please see http://java.sun.com for Windows, Linux and Solaris installation instructions and http://www.apple.com/java/ for Macintosh OS X installation instructions.
Once you have installed Java, please copy the downloaded files to a directory of your choice and execute the RodDNA.sh or the RodDNA.jar file to launch RodDNA.
If you decide to uninstall RodDNA, and you want to keep your data files, please copy them to another location on you disk as the uninstall program will remove all the files contained in the RodDNA directory.
Before you can utilize RodDNA, you will need to register on-line, so you will need to be connected to the Internet to do so.
The first dialog allows you to login with your existing UserName and Password in case you have previously registered, or to register for the first time or to exit. Select Register to register for the first time. You use Login to load RodDNA on more than one computer so you won’t have to register more than once.
You will need to specify your information, including a UserName and Primary Expertise.
The UserName is the name that you will be known by, so please pick a name that you are comfortable with. The UserName must be one word, consisting of only letters or numbers (no spaces or special characters allowed).
When have completed the form please click on the Apply button. Once registered, RodDNA’s main dialog will be displayed.
RodDNA is a networked client/server software application for Rodmakers owned and developed by High Sierra Rod Company & Larry Tusoni. It has been designed to run on various computer operating systems including Microsoft’s Windows™, Linux™ and Sun Microsystem’s Solaris™.
RodDNA licenses are provided free of charge provided the Rodmaker agrees to the license terms, registers, visits the sponsor’s web sites and connects to the Internet periodically. The Sponsors may help keep RodDNA licenses free, and provide support and ongoing development so I urge you to frequent their sites via their banners and promotion links. Please mention RodDNA when communicating with them.
RodDNA provides the Rodmaker an integrated array of helpful rod-making applications called modules. Each module has a discreet function, but may depend on other modules for some data. The Module’s associated data is saved on the local computer’s disk, and can optionally be saved to the network for backup or sharing purposes, or to allow Rodmakers to use RodDNA from various locations. Some modules data can be shared with one or more Rodmakers or not shared at all.
All data is stored in a universal format called XML (eXtensible Markup Language). This means that your data may be utilized easily in other applications, potentially without any conversion or re-keying, so you are not locked in to using RodDNA exclusively.
Data from other Rodmakers programs can be imported directly.
RodDNA has an associated software component called RMI servers. These servers are owned and operated by the author. RodDNA can operate with or without the servers, but functionality will be limited.
When RodDNA is connected to the Internet (and the Servers), Rodmakers can search to see who is on-line and potentially communicate with them; register or update registration information such as email address, Rodmakers with whom you want to share files with, etc.; save and load data to and from the network; and retrieve updated sponsor information and master Model and Vendor updates.
No personal information will be shared or disseminated, nor will any rod or customer information. Vendors and Models (Tapers) can be shared or not as previously mentioned.
When you register you pick a unique user name. This is the name that you will be known as so pick a meaningful name. You may also pick a primary expertise. This primary expertise can be selected by other Rodmakers wanting help or to chat about a related issue. Your current email address should be maintained as various functions rely on it (such as password reminders).
Many program options can be modified by the Rodmaker, such as search criteria, rod defaults, file names, etc.
New releases are already being worked on and will be announced via email to current users and announced on the http://www.HighSierraRods.com website.
Once you have installed RodDNA, you will need to register. You will need to be connected to the Internet to do so. Please enter valid information, especially user name and email address. Also, one of the main functions of RodDNA is to facilitate information sharing, so I encourage you to share you Models and Vendors data with everyone, or at least other Rodmakers with whom you are acquainted with. Once registered you are ready to start using RodDNA.
RodDNA comes with preloaded files for all modules. You can modify and save you edits using these files. You can also reload the Vendors and Models data directly from the Internet from the [Master] user.
Many program components, including menus, button, fields, etc. have associated tool tips that indicate the components function. The tool tips are visible when you place the mouse cursor over the component a short time without movement.

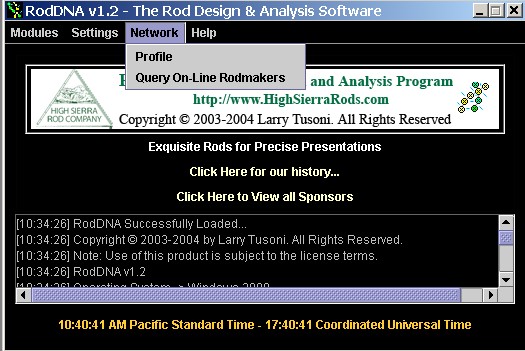
RodDNA’s main dialog provides access to the settings and Modules. It also displays rotating sponsor banners (with associated website links), descriptions and optional sponsor promotions with associated links. Program session information is indicated in a scrolled window, and the current time is displayed in local and UTC (Universal Coordinated Time - formerly called GMT). Note that the UTC time may be useful for determining when an international Rodmaker may be on-line, etc.
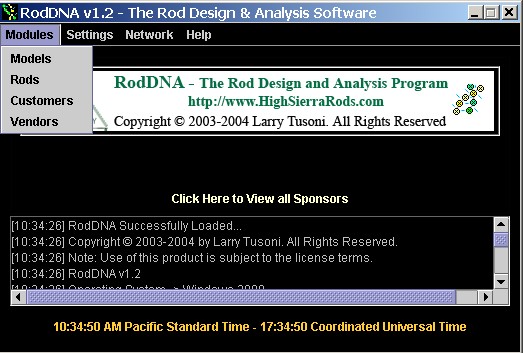
Modules are applications, each providing a distinct function. Four Modules are supplied: Customers, Vendors, Rods and Models. Optional modules may be downloaded and installed to provide additional functionality. The Customer and Vendors modules are self explanatory. Customers buy your rods, and you buy supplies from Vendors. The Customers are your customers, and therefore cannot be shared.
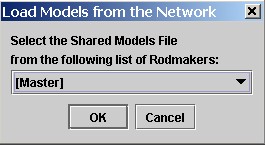
The Vendors are universal to all Rodmakers and can and should be shared with everyone. A special user named [MASTER] exists on the system from which a master Vendor file can always be loaded.
The Rods Module contains all pertinent rod information for rods you have built and are building. All components have an associated Source field that indicated the source of the component. These source lists are compiled from both the associated program option fields and the default Vendor’s file, so you may want to customize the program options first.
The Rod serial numbers can be automatically generated or manually entered and validated. A serial number mask can be defined in the program options file (Serial # Mask) which is used to direct how the program creates or validates a new serial number.
No Model (Taper) information is kept in the Rod files, only which Model the rod is based on is noted. Therefore you should have a model for every rod (or Rods) you build. You can always create a new Model entry that can be updated later.
The Model Module contains the rod design information, planing form station increment, bamboo density, etc. Rods are Modeled from Model entries. The easiest way to enter model information (aside from Importing) is to enter the tapers using the station increment of your forms (normally 5" increments) in the Values tab table. Once you do so, you can change the station increment to 1" and the program will automatically calculate the intermediate values if you so desire. Note that converting back and forth from a given station increment to another may result in less precise values due to rounding. Once you have entered the Models information you can have the program calculate the stresses and chart them as desired. The detailed calculation values can be viewed in the Details tab table and the associated chats can be viewed in the Chart tab charts.
The Models are universal to all Rodmakers and can and should be shared with everyone. A special user named [MASTER] exists on the system from which a master Models file can always be loaded.
Each module has at least one associated XML file which contains the data. Many files can exist, but the program keeps the name of the main file in the program options and automatically loads this file into memory when a module is invoked. When you add or edit the module’s information, the changes take place in the computer’s memory only. You must explicitly save the data to a file (or network) via the file menu or when you exit the module.
This strategy allows you to experiment with the data and only save the data permanently once you are satisfied with it, so you should only save the data to disk or the network once you are sure that your changes are valid.
As mentioned, you can save or load a module’s data to/from the network at any time (assuming you are connected to the Internet). Only one instance of data can be saved, so no file naming is required. This can be though of as a scratch-pad memory, or calculator memory that you may recall at any time in the future. This facility is very handy to do a quick backup and to allow Rodmakers to work on the same data from various computers/locations as the data on the local hard disk need not be used.
Entering/Editing & Validating Data
You select the desired row and column by scrolling vertically and horizontally as needed using the scroll bars on the bottom and right of the display (the vertical scroll bar will be absent if you have only a few rows).
To edit, single click on a particular row/column and start keying (grayed out columns are not editable). You can use the backspace and delete key to correct and delete characters. You can edit within existing data by double clicking in the particular row/column, and edit as above but you can now use the cursor key to determine the editing position. You can select words by double clicking on them, etc.
Certain column values are selected by a pull-down list of predefined values. Numeric fields may allow only a range of values which may be defined in the program options file.
Some Modules (like Models) have a Tool menu from which you can select to validate all entries. Any entry or row can be validated by double-clicking on the ID# column. You will see either a dialog box with the error description (also displayed in the lower part of the dialog) or simply a messaged that the entry is valid in the lower information box contained in all the Modules.
Note that some menus may not be available if you are not connected to the Internet. Also, some menus and menu items may be or not be available depending on how many rows are selected.
Every Module has an associated File Menu that is used to save and load the Modules data, to or from the local hard-disk, or the network. Load, Save and Save As allow you to load and save module data to and from the local hard-disk by selecting a file name to save with or load from. You will always be asked to overwrite any previously existing file.
The Load From and Save To Networks options may or may not be available depending on if you are connected to the Internet or not.
The Save To option allows you to save your current module data to a server on the Internet, replacing any previously saved data. Only one instance of module data is retained.
The Load From option will load your previously saved module data for your private Rod and Customer modules. For Models and Vendors, you may be provided with a list of Rodmaker usernames who have either shared their Models and/or Vendors data with everyone or other Rodmakers including yourself. You can always load your own, previously saved Models and Vendor data.
Every Module organizes entries in rows and columns. A row represents a complete module entry, such as a rod. You can sort the module’s display by the contents of any field by clicking on the sorting column’s header for ascending order (indicated by an up-arrow) or clicking again for descending order (indicated by a down-arrow) and clicking again for no sorting. Note that once you have sorted the entries, you cannot perform any options until you either return to a non-sorted list (click on the sorted column heading which contain the arrow until you don't see an arrow) or by selecting Save current sort state from the Tools menu. Once you save the sorted state, you will now have the entries in the sorted order in memory. If you want to permanently save them use the File menu options.
Rows can be selected by clicking on them. When a row is selected it is highlighted. Multiple rows can be selected by holding down the shift or control (ctrl) key while clicking the mouse. To select multiple contiguous rows, select the first row then hold the shift key and click the last row. To select multiple non-contiguous rows, hold the control (ctrl) key while clicking on the desired rows.
Once one or more rows are selected, you can use the edit menu options. You can always append a new row at the bottom of the list, which may contain default options that you can define via the program options. Inset will insert a new row of data with default values in front of the first selected row. Clear will set the selected rows to the default values. Delete will remove the selected rows. Copy will copy the selected rows data to an intermediate buffer for later pasting. After copying some row or rows, you can paste the copied row or rows over another row or rows by selecting the same number of rows and then clicking on the paste option from the edit menu. Note that you will be warned if you copy and then paste a different number of rows and the operation will be carried out despite the imbalance.
The print menu allows you to print the selected rows as a tabular list (one line per row) or a report with one (or more) pages per row.
Certain reports are more sophisticated. For example, the Planing Report available from the Print menu in the Models Module allows you to view the report, zoom in or out and to save the report as a PDF file.

RodDNA can be highly customized by the Rodmaker. For example, you can: define default values and ranges for most fields; define information used to create or validate your rod’s serial number scheme; define default file names for the Module data, etc. The program options can be changed (applied) and tested before saved permanently in the program options XML file.
There are two values per entry that may be edited: the Current Value(s) and the Default Value(s).
The Current Values(s) typically contains the current values that will be used for determining ranges, pull-down list contents, etc. You can reset these values to a default setting at any time by clicking on the Default button when editing.
The Default Value(s) contain the default value that will be used when you create (Insert or Append) a new entry in a Module. For example, when you create a new Rod, you either Append it to the bottom of the Rod list or Insert it in front of an existing Rod entry. When it is created, certain fields may contain default entries from the Program Options file.
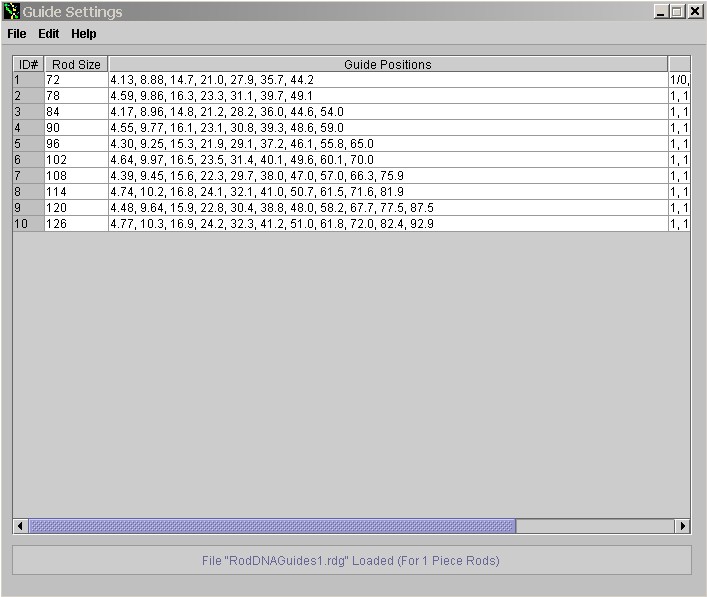
RodDNA can set the default guide locations and guide sizes automatically. Rather than calculate the positions, four files are used to determine the guide locations and sizes, one for 1 through 4 piece rods. When you select the Guide Settings from the Settings Menu, you select which of the four files you would like to view or edit. The number of pieces is indicated in the file name ending. Note that Rod Sizes must be in ascending order, and can be copied and pasted if needed. Also, the # of Guide Positions must match the # of Guide Sizes.
RodDNA uses the rod's # pieces to determine which guide file to load, then uses the Rod Size (or the closest matching entry) for the values. The Stripper size is determined by the line weight. for weights 2, 3 & 4 the size is #8. For weights 4 & 5 the size is #10. For weights 6 through 9 the size is #12, and above 9 is a #14.
RodDNA can control certain bevellers/mills that have computer control capabilities. These Modules may be optionally installed. Please refer to http\\www.HighSierraRods.com for availability.
You must be connected to the Internet, or the Network functions will not be available.
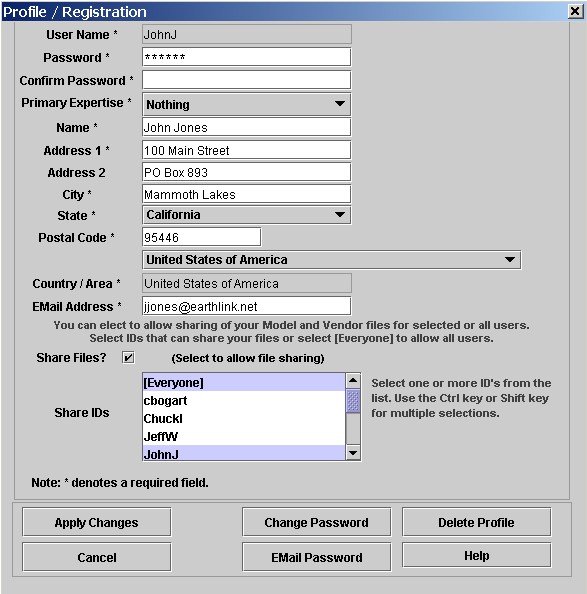
The profile selection allows you to view and edit your on-line registration information. You can update any item except your user name. If you delete your profile, you will have to re-register to use RodDNA.
You can select with which users you would like to share you Vendors and Models data. I encourage you to share these files with Everyone, or at least, users with whom you are acquainted with. To share these files, first check the Share Files check box, then select either [Everyone] or select user IDs using the shift or Control (ctrl) key while clicking on users (IDs). (Note that you must also save your Vendors and Models to the networks from those Modules before any user can share them).
Since you need your password for all functions except Email password, you can use this function if you can’t remember your password.
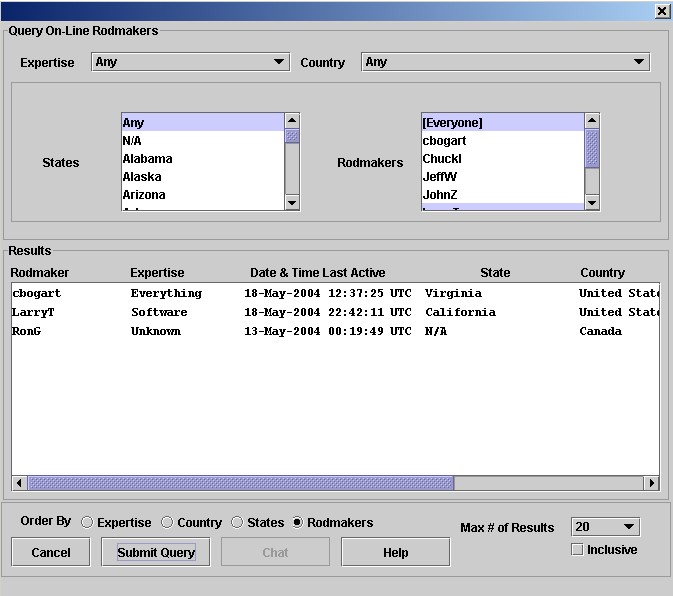
The query function allows you to search for Rodmakers that have a particular expertise that might be willing to help you with a particular issue.
This dialog allows you to search RodDNA’s on-line list of Rodmakers. You can select Rodmakers by a particular primary expertise or any expertise, in a particular country or any country, in a particular state or any state or by username or everyone.
You can order the list by any of the search criteria, and you can specify how may results to return. The Inclusive check-box is used to select Rodmakers that match all the criteria if checked, otherwise, a match of any one will provide a match.
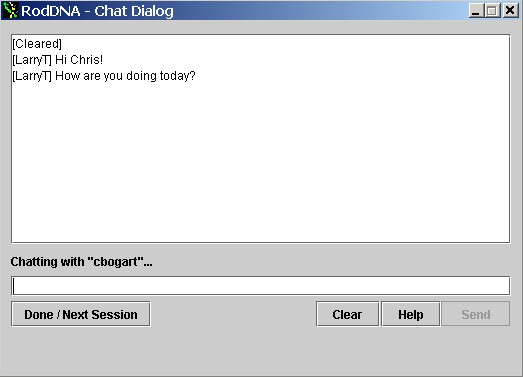
Once a list is displayed, you can highlight any Rodmaker and by clicking on the Chat button, you can initiate a chat session with them. You may want to check the date and time to see if they are currently on-line (you can see the current UTC time in the mail RodDNA dialog).
You chat massages will be delivered immediately to the Rodmaker if he/she is on-line, or will be delivered when they are next on-line.
The Chat facility allows for a 0ne-on-one session only. If other Rodmakers want to chat with you, you will see a waiting message and once you finish the current session by clicking on the Done button, the new session will start.
When you exit your current search options can be saved for your next query.
The Contents selection will link to a webpage located on the author’s server, so you will have to be connected to the Internet to view it. The About selection provides system and version information.
RodDNA has been designed and developed using modern object-oriented programming techniques that allow you to operate on multiple instances of a given module simultaneously. (The limiting factor being the amount of available computer memory)
For example, you may have two Model files: a master one that you loaded from the network and your normal one. You can view them in separate Model dialogs and copy and paste between them both vs. re-keying the information manually.
Modules – Detailed Information
The Models Module is used to help the Rodmaker design a new rod by providing many explicit and implicit functions. Models can (and should) be shared will other Rodmakers and a master copy can always be loaded from the RodDNA server. See Modules Menu above for non-specific information.
Each row represents a Model. Each row contains many columns or fields. Fields may contain alphanumeric, numeric or pull-down lists of predetermined values. The fields are as follows:
|
ID# |
This is a program generated field indicating the number of the Model or row. |
| DB# | This is the Model's Master Database # and cannot be changed. This is used to associate comments with Models. |
|
Name |
The unique name of the particular Model. |
|
LengthInch |
The rod length in inches. The length range is defined in the Program Options field Rod Length Range. Changing this value will automatically adjust the ferrule locations and sizes. |
|
ActLngInch |
The rod’s action length (usually LengthInch -10"). The length range is defined in the Program Options field Rod Length Range. |
|
Const Type |
This is the construction type of the rod, typically hex or six sided. . The values are defined in the Program Options field Construction Type List. Changing the Construction Type may generate a new model. See the Automatically Generated Models section for more information. |
|
Line Weight |
The line weight of the rod. . The weight range is defined in the Program Options field Line Weight Range (Not the Line Weight Value List) |
|
Line Length |
This is the physical length of the given line. . The line length range is defined in the Program Options field Line Length Range. |
|
Line Cast |
This is the casting length of the given line. . The line length range is defined in the Program Options field Line Cast Length Range. |
|
Pieces |
The rod’s number of pieces. The rod pieces range is defined in the Program Options field Rod Pieces Range. Changing this value will automatically adjust the ferrule locations and sizes any may generate a new model. See the Automatically Generated Models section for more information. |
|
F1Size |
The size of the first ferrule in 64 inch. The ferrule size list is defined in the Program Options field Ferrule1 Size List. This can be automatically calculated by the program or manually entered. |
|
F2Size |
The size of the second ferrule in 64 inch. The ferrule size list is defined in the Program Options field Ferrule2 Size List. This can be automatically calculated by the program or manually entered. |
|
F3Size |
The size of the third ferrule in 64 inch. The ferrule size list is defined in the Program Options field Ferrule3 Size List. This can be automatically calculated by the program or manually entered. |
|
Ferrule Type |
The type of ferrules used. The ferrule type list is defined in the Program Options field FerruleType List. |
|
F1Location |
The location of the first ferrule. This can be automatically calculated by the program or manually entered. |
|
F2Location |
The location of the second ferrule. This can be automatically calculated by the program or manually entered. |
|
F3Location |
The location of the third ferrule. This can be automatically calculated by the program or manually entered. |
| Tip Top Size | The size of the Models tip top guide. |
| LWV | The Line Weight Value from Controlled Modification |
| RAV | The Rod Action Value from Controlled Modification |
|
ImpactFactor |
The Impact Factor Multiplier. Normally set to 4 but can be varied as desired. |
|
Bamboo |
The weight of the Bamboo per cubic inch. Normally set to 0.668 .oz/cu in. but can be varied as desired. |
|
Tip Weight |
The weight of the Tip Top. Normally set to 0.018 .oz but can be varied as desired (this has a minimal effect on the moment calculations) |
|
StationMul |
Multiplier used in calculating the planing form values. |
|
StationBias |
+/- amount used to adjust the planing form values. |
|
StationIncr |
The Station Increment of your taper/stress values which normally corresponds to the station increments on your planing forms. Values from 1" to 12" can be specified. |
|
Notes |
Comments & Notes about the model. |
|
Dimensions |
The Model’s dimension values at StationIncr increments. Edited via the Values tab or by the Model Taper Dimensions dialog, which is accessed by clicking on this field. See Entering Model Tapers and Creating linear tapers |
|
Stresses |
The Model’s stress values at StationIncr increments. Edited via the Values tab or the grid. Note that you can paste a comma separated list of values in this field vs. entering them via the Values tab. |
| Guide Spacings | The Model's guide spacings. Note that you can paste a comma separated list of values in this field vs. entering them via the Values tab. |
| Guide Sizes | The Model's guide sizes. Note that you can paste a comma separated list of values in this field vs. entering them via the Values tab. |
There are currently five tabs available:
The Models Tab is the main tab, and is used to view/enter/edit Model data except for the Dimension or Stress values.
The Stresses & Dimensions thumbnail charts are automatically rendered when you select at least one Model or row. Since the detailed calculation values are not saved, the calculations need to be performed before the charts can be rendered and thus can take a few seconds on a slow computer. If you like, you can select Automatic or Manual charting via the Program Options Charting Method option.
The Values Tab is used to view/enter/edit the Dimension and/or Stress values for the selected Model. Once you modify the values, you can either save them or reload the initial values from the associated Model. You need only enter Dimensions and RodDNA will automatically calculate the corresponding stresses. The number of values will correspond to the Model’s Action Length (ActLngInch) divided by the Station Increment (StationIncr). I recommend using 5" Station Increments as this corresponds to most planning forms, and minimizes the number of dimensions that have to be entered. Note that the Station Increment will also determine the increments on the Planing Report.
The Values Tab is also used to view/enter/edit the Guide Spacing and Size values for the selected Model. Once you modify the values, you can either save them or reload the initial values from the associated Model. You don't need to enter any values unless you want to change the default spacings and/or sizes (see Guide Settings). The number of values will correspond to the Model’s Rod Length (LengthInch) divided by 12 + 2.
The Details Tab is used to view the intermediate calculations, and is for reference only. Note that if the title reads Details+, the values will reflect the Controlled Modification calculations, and will show the resultant dimensions (Dimension) and factors (CM Factors).
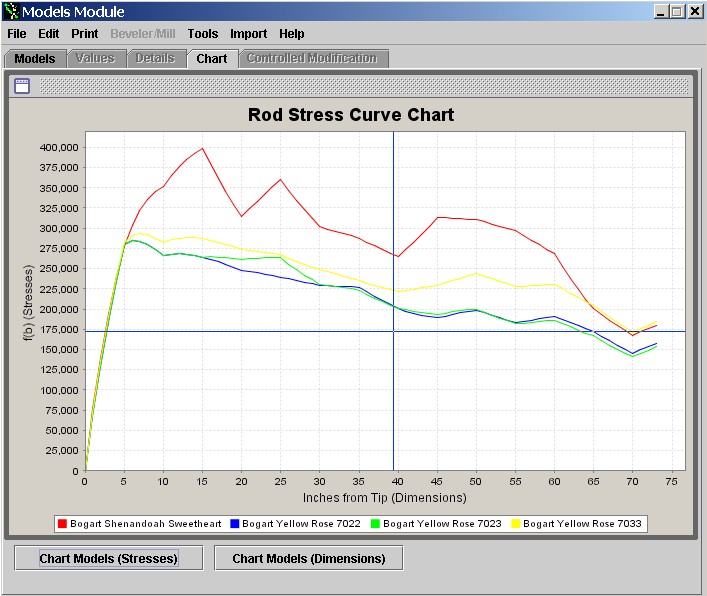
The Chart Tab is used to view the dimension and stress charts. You can select which chart to render using the Chart buttons located at the bottom of the dialog.
You can zoom-in by placing the cross-hairs on a location and dragging them while holding the left mouse-button.
Various options are available by a single click on the right mouse button:
|
Properties |
allows you to specify colors, fonts, etc. |
|
Save As |
allows you to save your rendered chart as a ".PNG" image file for you documentation. |
|
|
allows you to print your rendered chart (you might want to select Landscape mode) |
|
Zoom In |
allows you to zoom in (either or both axis) |
|
Zoom Out |
allows you to zoom out (either or both axis) |
|
Auto Range |
allows you to change either axis’s back to the original values while leaving the other as zoomed |
The Controlled Modification Tab provides access to my implementation of John Bokstrom's "Rod Design by Controlled Modification". Any selected Model can be modified to suit your own requirements of length, action, or line size. Fine adjustments are possible to tailor a rod to your precise personal preferences.
The Controlled Modification Dialog charts the selected Model's taper dimensions and rise in percentages vs. inches from the tip of the rod. The start and end of the rod's action curve are preset to 10% and 60% respectively, but can be changes and re-charted by clicking on the Chart Model button. Once charted, you can create a new Model after you select the new Model's Rod Length (Length), Rod Action Value (RAV) and Line Weight Value (LWV).
Because individual building techniques such as tempering, glue, etc. affect the end results, and because rod actions and line sizes are subjective judgments, it is suggested that the first rod built from this program not deviate too much from the original. This will assure a very usable rod and help develop confidence in future changes.
If you like the selected Model but want a longer or shorter version, simply edit the Length value and click on the Create New Model button.
The RAV (Rod Action Value) determines the action of the rod. Increasing this value makes the rod action faster, decreasing it makes the rod slower. A change of .003 is detectable, providing the rods are built in the same manner, while a change of .010 is definitely noticeable.
The LWV (Line Weight Value) determines the line size. An increase or
decrease of .004 to .006 will raise or lower the line size by one line weight
but finer adjustments can
be made if desired. Since judgment of line size is subjective, no definitive
values can be given.
There is a practical minimum diameter for the actual tip of a rod and, although this is already compensated for in the programs, it may be necessary to adjust the 0" diameter to not less than .0625 if designing a very light rod. See page 272 of the Garrison book.
You may note that the value of the slope rise lines at point 0 reflects the line weight. For example, ~.072 = 5wt, ~.078 = 6wt, ~.084 = 7wt, ~.088 = 8wt, ~.094 = 9wt, etc.
The File and Edit menus have been previously described as they are similar for all Modules. However, the Models and Vendor Modules allow you to load any shared Models or Vendors for which you have been allowed sharing privileges. Note that you can always load master copies of the [Master] Modules and Vendor files from the network.
Two additional entries are available for saving only the selected Models to either a file or the Network. This is a handy feature for sharing only some Models or a way of organizing Models into separate files, etc.
The Edit menu has been enhanced. The Select All and Deselect All will select and deselect all Models respectively. The Append Paste selection will paste any copied Models to the end of the Models list. This is a quick way to copy one or more Models for modification. You can then sort and save them in sequence.
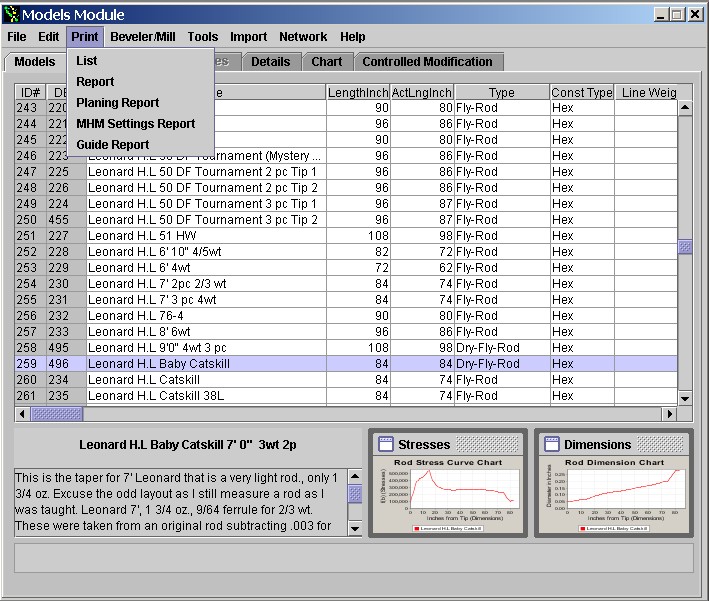
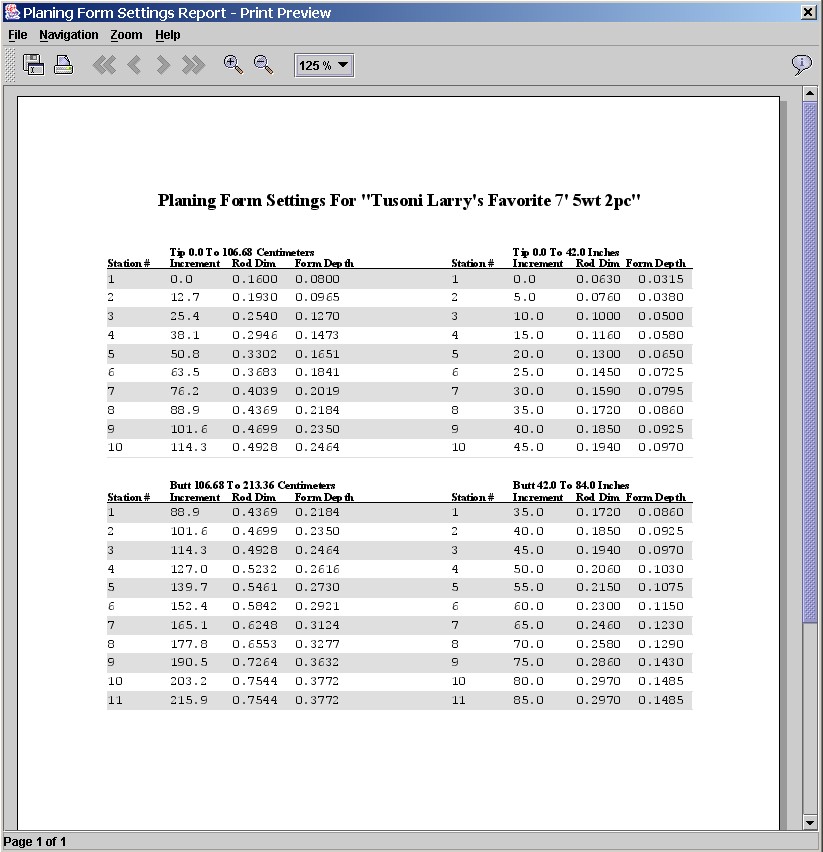


The File and Edit menus have been previously described. The Print menu provides a List report which will print one-line per Model selected, or a one-page Report per Model selected. The Planing report will print a combined metric/inch planning report for the selected Model (it has been designed to be folded in half vertically). Note that the planing report using the station increment defined in the Program Options file Planing Report Station Increment Range option and not the Models station increment. This allows the Model's dimensions to be specified in different increments vs. the planing forms actual station increments. The Guide Report will print a report for a selected Model containing guide #, guide position in inches, guide size and guide position in fractions for easy measurements. The Morgan Hand-Mill settings report will produce a report of the necessary settings for your hand-mill for any selected Model. Note that Form Depth is provided for you convenience.
If available, allows the calibration and transfer of a selected Model’s dimension information to the specified Beveler or Mill.
This menu provided an option to validate all existing Models which can be automatically run via the Validation Method selection in the Programs Options. Note: you can validate any Model by quickly double-clicking on the ID# column, which is useful when you create a new Model and want to quickly validate it.
Ferrule sizes/positions and Tip top sizes can be automatically calculated also by selecting which models you would like then selecting the Calculate Ferrule Sizes & Positions & Tip Top Size option.
If your list of Models is sorted, you can use the Tools menu selection Save current sort state to save the sorted Models list in memory. Use the File menu options to save it permanently.
You can automatically have the Line Length and Line Cast Length set for selected models by the menu selection by that name. Note that the line weight is used to determine the Line Cast Length. This is important for correct Stress calculations.
The Calculate LWV and RAV menu selection utilizes the Controlled Modification component to generate the LWV (Line Weight Value) and the RAV (Rod Action Value) for the selected Models. This is useful for comparing different Models. Note that you can sort on either value for easier comparisons.
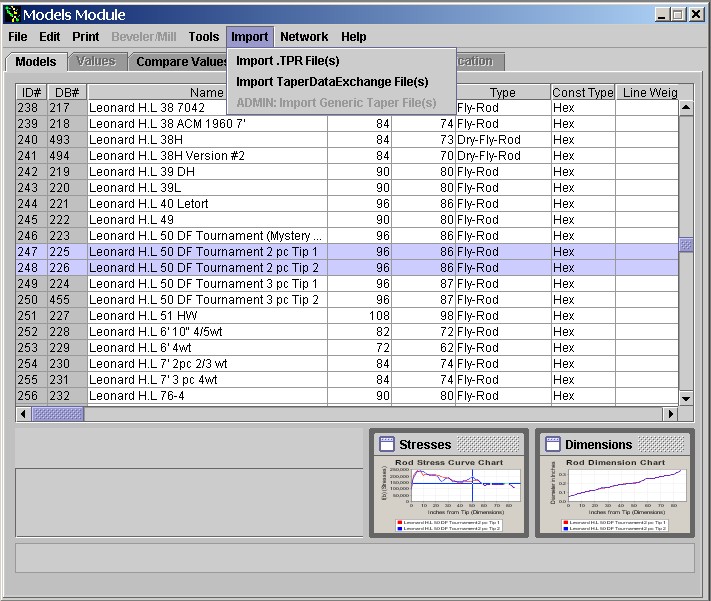
The Import Menu allows you to quickly load any existing Model information that you may have previously saved in other file formats. One or more files can be selected at a time.
Since each file type contains different data, you should check each Model’s data once imported by running the validation function and by visually checking it.
Currently, taper files (files suffixed with .tpr) can be directly imported via the Import .TPR File(s) selection. Each taper file contains one Rod taper or Model, and it’s values will be appended to the end of your existing Model list.
Current Taper Data Exchange files can also be imported via the ImportTaperDataExchange File(s) selection. Note that the import file should be created using tabs as the field separator, including header record with field names (do not enclose fields in double quotation marks.)
A Network Menu has been added and will be enabled when you are connected to the Internet.
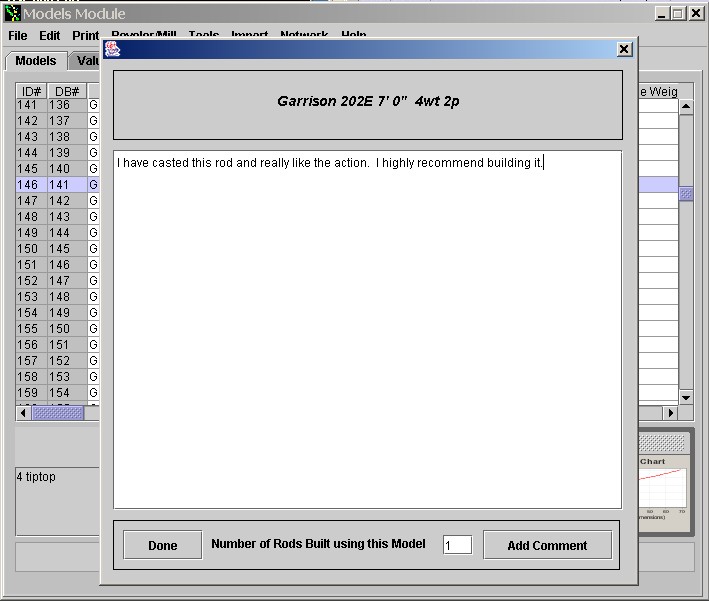
When you have any one Model selected, the top three options will be available. The View the Selected Model's Comments selection allows you to view the comments (if any) that may have been posted to the master database for the selected Model. The Add Comment for the Selected Model to the Master Database selection allows you to add a comment for the selected Model to the master database for others to read. Note that you can and should indicate how many rods you have built using this Model. This could be used to rank the Models. You can use plain text and / or HTML for your comments. Note that you cannot view or add comments for Models that you create until you submit them to the Master Database.
If you have created a new or many new Models, and would like to have them included in the Master Model Database, select them, then select the Network Menu option labeled Submit the Selected Model(s) to the Master Models Database. The selected Model(s) will be submitted for inclusion in the Master Database after approval. Once added, you can then enter any comments that you wish.
Automatically Generated Models
New discreet Models may be automatically generated when certain fields are modified. For example, if you change the Construction Type (Const Type) from Hex to Quad, you will have the option to let RodDNA generate a new Model in which the dimensions will be converted for the Quad rod. You can convert from Hex to Quad or Penta, and from Quad to Hex.
Also, if you change the # of pieces (Pieces) you will have the option to let RodDNA generate a new Model in which the dimensions will will reflect the same stresses as the original rod, and therefore the same action.
The other way to let RodDNA generate a new Model is when you use the Controlled Modification feature previously mentioned.
The Rods Module is used to catalog the Rodmaker’s rod inventory of crafted rods. Rods cannot be shared with other Rodmakers. See Modules Menu above for non-specific information.
Each row represents a Rod. Rods are based or derived from Models. Each row contains many columns or fields. Fields may contain alphanumeric, numeric or pull-down lists of predetermined values. Every Source field may have an associated Internet URL for a Vendor or Customer, and you can access the URL by selecting the field from the list and clicking the right mouse button (you must, of course, be connected to the Internet).
The fields are as follows:
Name Description Programs Option Entry
|
ID# |
This is a program generated field indicating the number of the Rod or row. |
N/A |
|
Serial # |
This is the Rod’s serial number, which may be automatically or manually created. A serial # mask is used to determine the composition. |
Rod Serial # Mask |
|
Start Date |
This is date the rod was started. |
N/A |
|
End Date |
This is date the rod was completed. |
N/A |
|
Status |
This is the rod’s current status. |
Rod Status List |
|
Purpose |
This is the rod’s intended purpose. |
Rod Purpose List |
|
Type |
This is fishing type of rod |
Rod Type List |
|
Model |
This is Model that the rod is derived from or modeled from. Note that the line size, rod length, ferrule sizes, # pieces will be copied from the Model to the Rod automatically. |
Created from the default Models data Name field. |
|
Length |
The rod length in inches. |
Rod Length Range (copied from the associated Model) |
|
Weight |
The rod’s weight in ounces. |
Rod Weight Range |
|
Line Weight |
This is the recommended DT line weight. |
Line Weight Range |
|
Line Type |
This is the recommended line type. |
Line Type List |
|
Const Type |
This is the construction type of the rod. |
Construction Type List Range (copied from the associated Model) |
|
Pieces |
The rod’s number of pieces. |
Rod Pieces Range (copied from the associated Model) |
|
# Tips |
The number of tips built for the rod. |
Rod Tips Range |
|
Appearance |
The rod’s appearance. |
Rod Appearance Type List |
|
Adhesive |
The adhesive used to bond the rod. |
Rod Adhesive List |
|
Adhesive Source |
The source of the adhesive. |
Rod Adhesive Source List (and Vendors that sell adhesives) |
|
Finish |
The rod’s finish. |
Rod Finish Type List |
|
Finish Source |
The source of the rod finish. |
Rod Finish Source List (and Vendors that sell finishes) |
|
Finish Coats |
The # of finish coats applied to the rod. |
Rod Finish Coats Range |
|
Applied |
How the finish was applied. |
Rod Finish Applied List |
|
Material |
The material used to make the rod. |
Rod Material Type List |
|
Material Source |
The source of the material used to make the rod. |
Rod Material Source List (and Vendors that sell rod material) |
|
Oven |
This is the type of oven used. |
Oven Type List |
|
Oven Source |
The source of the oven used. |
Oven Source List (and Vendors that sell ovens) |
|
Oven Time |
The oven time in minutes. |
Oven Time Range |
|
Oven Temp |
The oven temperature used. |
Oven Temp Range |
|
Node Prep |
The node preparation scheme used. |
Node Prep List |
|
Node Stagger |
The node staggering scheme used. |
Node Stagger Type List |
|
Ferrule Type |
The ferrule type used. |
Ferrule Type List Range (copied from the associated Model) |
|
Ferrule Source |
The source of the ferrules. |
Ferrule Source List (and Vendors that sell ferrules) |
|
Ferr Adhesive |
The type of ferrule adhesive used. |
Ferrule Adhesive Type List |
|
Ferr Adhes Source |
The source of the ferrule adhesive. |
Ferrule Adhesive Source List (and Vendors that sell ferrule adhesives) |
|
F1Size |
The size (in 64s) of the first ferrule. |
Ferrule 1 Size List Range (copied from the associated Model) |
|
F2Size |
The size (in 64s) of the second ferrule. |
Ferrule 2 Size List Range (copied from the associated Model) |
|
F3Size |
The size (in 64s) of the third ferrule. |
Ferrule 3 Size List Range (copied from the associated Model) |
|
# Guides |
The number of guides used. |
Guild Number Range |
|
Guide Type |
The type of guides used. |
Guide Type List |
|
Guid Source |
The source of the guides. |
Guide Source List Ferrule (and Vendors that sell guides) |
|
Guide Prep Sz |
The size of the prepared guide feet. |
Guide Feet-Size List |
|
TipTop Size |
The size of the tiptop used. |
Tiptop Size List |
|
TipTop Type |
The type of the tiptop used. |
Tiptop Type List |
|
TipTop Source |
The source of the tiptop. |
Tiptop Source List (and Vendors that sell tiptops) |
|
TipTop Adhev |
The tiptop adhesive used. |
Tiptop Adhesive Type List |
|
Hook Keeper |
The type of hook keeper used. |
Hook Keeper Type List |
|
Hook Keeper Src |
The source of the hook keeper. |
Hook Keeper Source List (and Vendors that sell hook keepers) |
|
Stripper Type |
The type of stripper used. |
Stripper Type List |
|
Stripper Source |
The source of the stripper. |
Stripper Source List (and Vendors that sell strippers) |
|
Stripper Size |
The size of the stripper. |
Stripper Size List |
|
Guide Spacing |
The guide spacing scheme used. |
Guide Spacing List |
|
Thread Type |
The type of thread used for wraps. |
Thread Type List |
|
Thread Source |
The source of the thread. |
Thread Source List (and Vendors that sell thread) |
|
Thread Color |
The color of the thread used for wraps. |
Thread Color List |
|
Thread Size |
The size of the thread used for wraps. |
Thread Size List |
|
Thrd # Wraps |
The # of wraps used. |
Thread Wraps Range |
|
Tipping Type |
The tipping thread type. |
Tipping Type List |
|
Tipping Source |
The source of the tipping thread. |
Tipping Source List (and Vendors that sell thread) |
|
Tipping Color |
The color of the tipping thread used. |
Tipping Color List |
|
Tipping Size |
The size of the tipping thread used. |
Tipping Size List |
|
Tipping # Wraps |
The # of tipping wraps used. |
Tipping Wraps Range |
|
Color Preserver |
The thread color preserver used. |
Color Preserver Type List |
|
Color Presrver Src |
The source of the thread color preserver. |
Color Preserver Source List (and Vendors that sell color preserver) |
|
Thread Finish |
The thread finish used. |
Thread Finish Type List |
|
Thread Fininsh Src |
The source of the thread finish. |
Thread Finish Source List (and Vendors that sell thread finish) |
|
Signature Type |
The signature wraps scheme used. |
Signature Wraps Type List |
|
Grip Shape |
The shape of the grip used. |
Grip Shape Type List |
|
Grip Material |
The grip material. |
Grip Material Type List |
|
Grip Source |
The source of the grip or material. |
Grip Source Type List (and Vendors that sell grips and/or grip material) |
|
Grip Length |
The length of the grip in inches. |
Grip Length List |
|
Winding Check Type |
The type of winding check used. |
Winding Check Type List |
|
Winding Check Src |
The source of the winding check. |
Winding Check Source List (and Vendors that sell winding checks) |
|
Winding Check Size |
The size of the winding check. |
Winding Check Size List |
|
Reelseat Type |
The type or style of reel seat used. |
Real Seat Type List |
|
Reelseat Source |
The source of the reel seat. |
Real Seat Source List (and Vendors that sell reel seats) |
|
Reelseat Size |
The size of the reel seat. |
Reel Seat Size List |
|
Reelseat H/W |
The type of reel seat hardware. |
Reel Seat Hardware Type List (and Vendors that sell reel seat hardware) |
|
Wood Insert Type |
The type of wood used for the insert. |
Wood Insert Type List |
|
Wood Insert Src |
The source of the wood used or the wood insert. |
Wood Insert Source List (and Vendors that sell wood or wood inserts) |
|
Sold To |
The person or entity that the rod was sold to. |
Sold To List (and Customer Names from the Customers Module) |
|
Sold Via |
The way the rod was sold. |
Sold Via List |
|
Planing Rough |
The rough planing method. |
Rough Planing List |
|
Planing Finish |
The finish planing method. |
Finish Planing List |
|
Binder |
The type of binder used. |
Binder List |
|
Binder Source |
The source of the binder. |
Binder Source List (and Vendors that sell binders) |
|
Notes |
Any informative rod information, research, repairs, etc. |
N/A Range (copied from the associated Model) |
RodDNA provides the ability to automatically generate or validate a rod’s serial number via a mask definition that allows many options. The mask is a string of characters that determines the generation and validation behavior. The mask options are as follows, and is defined in the Program Options file:
|
yy |
Year |
|
### |
Rod Number sum of all rods† |
|
&&& |
Rod Number sum of this size rod† |
|
%%% |
Rod Number sum of this exact rod† |
|
F |
# Feet |
|
I |
# Inches actual |
|
x |
# Inches in fractions (.5 = 6\") |
|
p |
# Pieces |
|
T |
# Tips |
|
R |
Taper Influence 2 |
|
L |
Line Size |
|
Z1 |
1st Ferrule Size |
|
Z2 |
2nd Ferrule Size |
|
Z3 |
3rd Ferrule Size |
|
MMM |
Maker's Initials |
|
AA |
Maker's Age |
|
H |
Hyphen/Dash Character* |
|
* |
Any character* |
† Sums are for only the current Rod file
* Can be specified more than once
2 Taper influence will automatically generate a questions mark that can be manually edited by the Rodmaker
to reflect the taper origin.
For example, if your serial # consists of the year, rod #, size in feet/inches, # pieces, the first ferrule size you could specify: yy###FIPZ1
If you want to manually specify the entire serial #, just use asterisks whose number indicate the serial # length.
A note on the sums: When RodDNA calculates the sum of all rods (###), the sum of all the same size rods (&&&) or the sum of the exact type rods (%%%), it only considers the rods defined in the current rod file. Also, if you have deleted a rod, that particular serial # will not be automatically generated again. You can always simply edit the desired changes manually. All sums are three digits.
You can quickly visit the Vendor’s URL in any Source field by selecting the field by clicking once in the URL field, then clicking the right mouse-button.
Customers – Detailed Information
The Customers Module is used to document the Rodmaker’s customers who have purchased a rod or rods. Customers cannot be shared with other Rodmakers. See Modules Menu above for non-specific information. You can access the URL by selecting the URL field and clicking the right mouse button (you must, of course, be connected to the Internet).
Each row represents a Customer.
|
ID# |
This is a program generated field indicating the number of the Customer or row. |
|
Name |
The name of the customer |
|
Post Address |
The USPS address |
|
UPS Address |
The UPS or FedEx (Street) address |
|
City |
The City |
|
State |
The State |
|
Zip |
The Zip code |
|
Phone |
The contact Phone # |
|
Fax |
The Fax # |
|
|
The Email address |
|
URL |
The URL |
|
Notes |
The Notes |
You can validate a Customer by quickly double-clicking your mouse on the ID# column. Customer Names must be unique.
You can quickly visit the Customer’s URL by selecting the URL field by clicking once in the URL field, then clicking the right mouse-button.
Customer Names are used in the Rods Module Sold To field.
Vendors – Detailed Information
The Vendors Module is used to document the Rodmaker’s vendors who supply rod making components or supplies. Vendors can (and should) be shared will other Rodmakers and a master copy can always be loaded from the RodDNA server. See Modules Menu above for non-specific information. You can access the URL by selecting the URL field and clicking the right mouse button (you must, of course, be connected to the Internet).
Each row represents a Vendor.
|
ID# |
This is a program generated field indicating the number of the Customer or row. |
|
Name |
The name of the customer |
|
Post Address |
The USPS address |
|
UPS Address |
The UPS or FedEx (Street) address |
|
City |
The City |
|
State |
The State |
|
Zip |
The Zip code |
|
Phone |
The contact Phone # |
|
Fax |
The Fax # |
|
|
The Email address |
|
URL |
The URL |
|
Items To Add |
Items that correspond to the Source fields in the Rods Module |
|
Items Sold List |
The list of items that this vendor sells (not directly editable) |
|
Notes |
The Notes |
You can validate a Vendor by quickly double-clicking your mouse on the ID# column. Vendor Names must be unique.
You can quickly visit the Vendor’s URL by selecting the URL field by clicking once in the URL field, then clicking the right mouse-button.
Vendor Names are used in the Rods Module Source fields.
The Items Sold List field indicates which items the Vendor sells. This field is populated by selecting the items sold in the pull-down list of the Items To Add field. A vendor may not have any entries in this field, or may have one or more.
Since the Items To Add list is derived directly from the Rod Module’s Source fields, it cannot be expanded, so any items that do not have a source field associated with them should be mentioned in the Notes field.
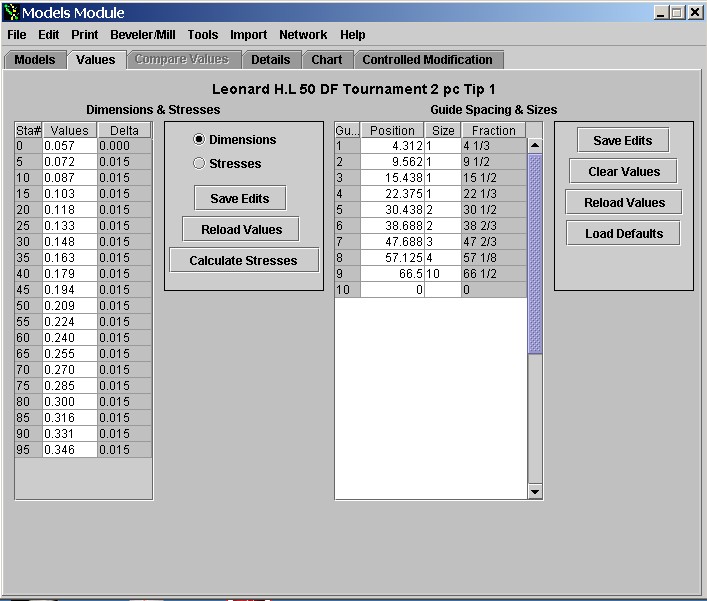
Entering Model taper dimensions and creating linear tapers
You have two options for entering or editing a Model's taper
dimensions. You can use the Values Tab to enter or
edit each taper directly, or you can use the Model Taper Dimensions
dialog. You access this dialog by clicking on the Dimensions field
for a selected model. You may have to scroll the Model's dialog to the right to
locate the Dimensions field, which is to the right of the Notes
field.

You can enter or edit Model taper dimensions in two ways: using the station # and the dimension or just the dimension. If you chose the latter, the program will assume that you are entering the dimension values in sequence starting with station #0 and that all values will be entered. If you chose the former, you need enter as few as 2 station # / dimension pairs and the program will calculate the missing values (you should always validate the generated results).
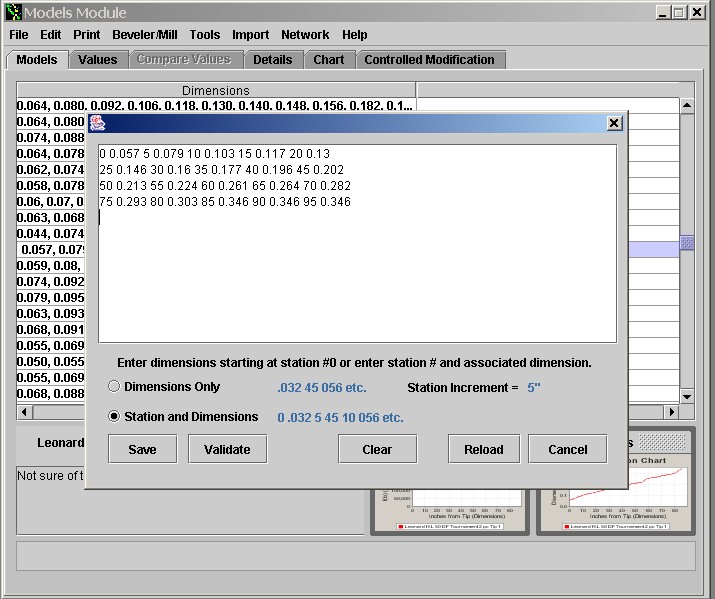
For example, let's say you are measuring a finished rod and some guides are placed at some station increment locations so you can't precisely measure the station dimension values. You can measure as close to station increment and enter that dimension value and the program will automatically calculate the station increment dimension value.
In other words, you can take arbitrary measurements on a given rod and the program will calculate the station dimension values.
If you creating a new Model, and want to start with a linear taper, all you need do is enter the station #0 and the associated dimension, and the last station # and the last dimension and the program will create a linear taper.
Here is an example: I have entered the first station # of 0 followed by the tip dimension 57 (.057) followed by the last station # of 95 with it's dimension of 346 (.346).
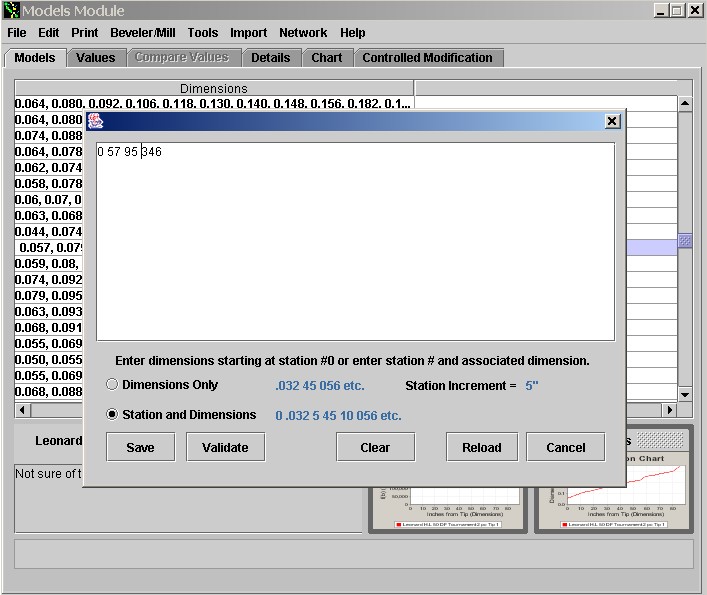
The resulting linear taper is show here. Note that all dimensions are exactly .015 apart.
(Frequently Asked Questions)
Why develop yet another Rodmaking program?
Well, firstly, I am a Software Engineer and a Rodmaker, so it was a logical decision.
I started developing RodDNA for my own personal use, as I needed some features and functions that I deemed important that the other programs did not offer. I later decided to offer it to other Rodmakers, and wanted to offer it free of charge, so that is why I have incorporated the sponsor approach; Mainly to cover the server and support costs. My main intent is to promote communication and the sharing of information. Only time will tell if I am successful or not.
Why is the main dialog not displayed in the center of my display like all the other dialogs?
The main dialog is used to launch the Modules and other navigation and is more easily located in a known position. You can always move it, but if you minimize it, it will pop up again.
Why aren’t the Models called Tapers, and why not just include the Model information in the Rods module?
The Models contain more than just tapers, and Rods are derived from a given Model, so it would be redundant to include the Model’s information in the Rods module. It is simply more logical and efficient as usually more than one rod is built
from any given Model.
Why does the Network menu disappear and reappear sometimes?
The Network menu will not be displayed if you are not connected to the Internet or if a
RodDNA server cannot be located. Once you are connected to the Internet, the Network Menu will again be displayed and the options will be available.
Why require that I have to be connected at least weekly to the Internet?
Mainly to share information and allow sponsors to update their information. These days, most computers are at least connected to the Internet on a dial-up basis.
Here are some of the new features of RodDNA v1.201:
1. Added LVW & RAV to Model table.
2. Modified Line Length and Line Case based on line weight.
3. Added Tools option for setting line length & line cast length.
4. Added Tools option for calculating LWV and RAV.
5. Added Option to save current sort state when trying to select a model.
6. Increased maximum rod length (and action length) to 168" (14') from 12'.
7. Changed tapers from 3 decimals to 4.
8. Added planing form dimensions rounded to .0005 (half thousands).
9. Added a dialog which allows editing of all the taper dimensions; the
creating of linear tapers; pasting or taper lists and automatic generation of
missing taper values.
10. Fixed all Quad and Penta Tapers.
11. Added Network Menu.
12. Added Network options for viewing and creating model comments.
13. Added Network option to allow selected model(s) to be submitted to the
master
DB (requires Administrative approval).
14. Added Edit Append Paste option which will pasted copied model(s) to the end
of
the model list.
15. Updated the Master list of Models. Now there are 527 Models. Many errors
were
fixed.
16. Added a Morgan Hand-Mill setting report that can be generated from any
model.
17. Increased maximum ferrule size from 18/64 to 22/64.
18. Added a link on the main dialog to view all sponsors.
19. Many other bug fixes and minor enhancements.
I have quite a few more features planned for future releases, so please let me know if you have any feature ideas that I should also implement. I have not released the Linux version as yet and won’t until I have sufficient demand for it.
If you have any questions or issues please email support@HighSierraRods.net. At the moment, I am not planning on any telephone support.
If There is a users mailing list where you can find useful information about RodDNA issues. Here is the URL:
I would like to thank the following individuals who have helped and contributed, directly or indirectly in this effort (in alphabetical order, females first):
My Wife, Lynda TusoniRodDNA contains an implementation of John Bokstom's "Fly Rod Design by Controlled Modification", and is used by permission.
RodDNA also contains an implementation of Mr.
Garrison's Stress calculation formulas from Chapter 14 of "The Book".
Larry Tusoni
Angels Camp & Virginia Lakes, California
18 May 2004
larry@HighSierraRods.net
http://www.HighSierraRods.com
Java, Sun and Solaris are trademarks of Sun Microsystems, Inc.
Windows is a trademark of Microsoft Corporation.
Macintosh is a trademark of Apple Corporation.
Copyright © 1998-2006 High Sierra Rod Company All Rights Reserved
